
")

")
3VZ Street Header Kit
(w/o Crossover)
Hands down the best 3.0L performance headers on the market! These headers are constructed using all stainless steel tubing, 16 gauge .065 wall, and 1/2" thick flanges. The collectors are 409 Stainless Steel made in house with 2 1/4" opening, for the strongest most durable headers you can buy. These headers are for 4WD applications only and are a direct fit application. Like all of LC Engineering's headers, these are ceramic coated to reduce heat and improve appearance.
The 3VZ header kit blocks off the EGR system as well as air injection. The kit will include the parts to block off both as well as a resistor selection to prevent check engine light. Some resistor changes may be necessary. The headers will end near the bell housing and exhaust will need to be made from there on.
Kit Includes:
- Headers
- Gaskets and hardware
- EGR block off kit
Optional: Header stud kit, see Part #: 1045031.
NOTE: Not C.A.R.B. approved. For off-road use only in California. It does not have EGR provisions or Air Injection. Will not fit 2WD Trucks. There are some potential fitment issues to be aware of. From the factory, Toyota used two different lengths clutch forks. If you have the longer version it will need to be trimmed for proper clearance. There are brake and fuel lines on the passenger side that may need to be carefully adjusted to allow for more clearance away from the exhaust system. LC Engineering does NOT recommend wrapping our headers with any sort of exhaust wrap. Doing so will increase the likelihood of a premature failure of the header, as it holds contaminants to the exhaust tubing and increases the chances of corrosion. Exhaust wraps will void any and all warranty claims.
| Note: Images are for illustration purposes only. Images may not represent the product listed. Please contact customer service with any questions or concerns: 1-928-505-2501. |
- 1988-1995 3VZ 3.0L Pickup Engines (4x4)
- 1988-1995 3VZ 3.0L 4Runner Engines (4x4)
- 1988-1995 3VZ 3.0L 4Runner Engines (4x2)
To open a printable PDF version of this instruction CLICK HERE
NOTE: For a successful installation, please read through the instructions entirely before starting. The Header Kit will remove the EGR valve and air injection (PAIR valve) form the engine.
Kit Includes:
- (1) Header Left/Right- Part # 1042127
- (1) Exhaust Gasket Set 3VZ - Part # 1044005
- (3) Collector Gasket 2 ¼" - Part # 1044027
- (1) O2 Sensor Gasket - Part # 1044024
- (2) M8 1.25 x30mm O2 Stud - Part # 8012372
- (2) M8 1.25 Flange Nut O2 - Part # 8012332
- (6) M10 1.25 Flange Lock Nut - Part # 8012225
- (6) M10 1.25 x Bolt - Part # 8012129
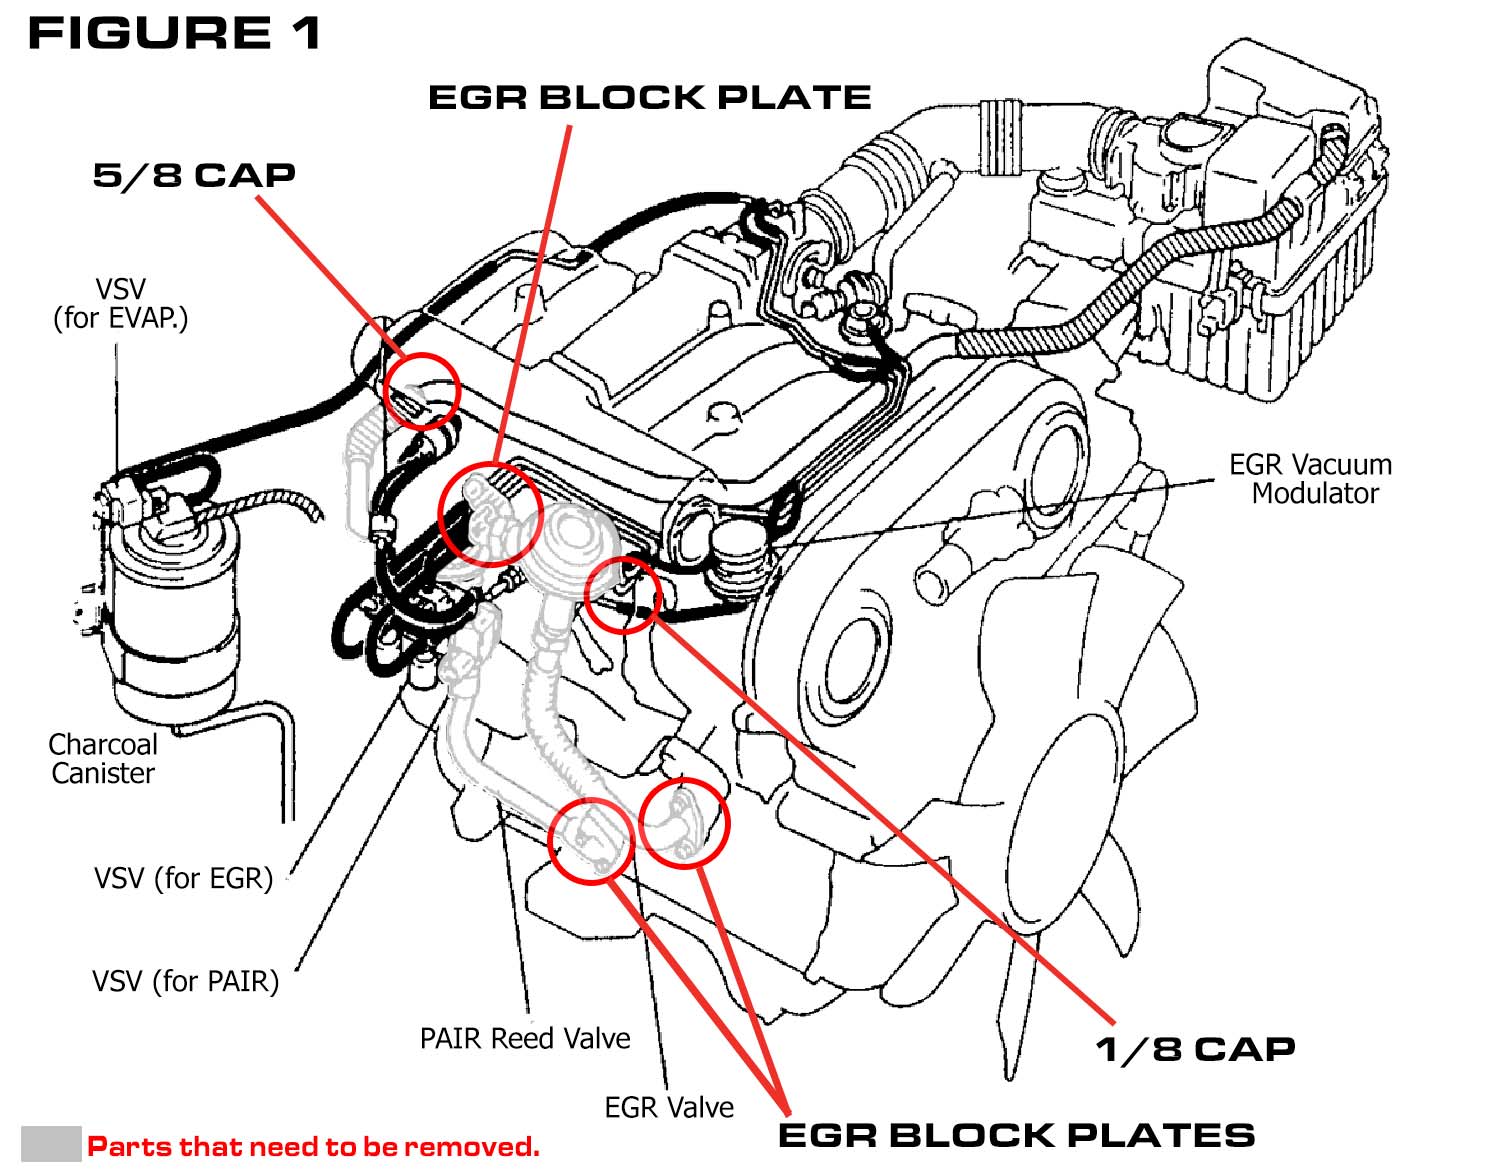
- (1) EGR Manifold Block Plate - Part # 1016036
- (1) 5/8 Vacuum Cap - Part # 1016036
- (1) 1/8 Vacuum Cap - Part # 1016036
- (2) Resistor 5.7K Ohm, 10K Ohm 1Each - Part # 1016036
Installation:
-
1. Disconnect the negative battery cable and then place the front of the vehicle securely on jack stands and remove the front wheels.
2. Remove the inner fender panels to access the lower manifold bolts.
3. Disconnect the O2 sensor before the catalytic convertor and remove sensor.
4. Remove the stock exhaust from the cat forward to the stock manifolds.
5. Remove the 6 nuts that connect the crossover tube (that runs behind the engine) to the manifolds. Then remove the heat shields on the manifolds.
6. Disconnect the EGR tubes that run from the passenger side manifold to the intake manifold. Retain the EGR heat sensor plug in the harness as that is where we will install a resistor. Also remove the air injection reed valve tube from the manifold. Both parts will not be reused.
7. Remove the exhaust manifolds.
8. Remove the crossover tube from behind the engine. Should exit the driver's side between the inner fender panel and the frame. (This takes some finess, but it will come out)
9. Clean the gasket surfaces with a contact cleaner and a clean shop towel.
10. Install the driver's side header using the new gasket supplied in the kit. Tighten the nuts. The best installation method is to install the header from beneath the vehicle, upwards.
11. Install the passenger side header. NOTE: The passenger side header is a very tight install. Take note of any wires or lines that need to be loosened or temporarily removed to aid in the installation of the header. On some models, it may be necessary to remove the lower (3) exhaust studs to set the header in place and then re-install them. If you find this necessary, use a good penetrant spray like "PB Blasters" to help remove the studs without damaging the threads inside the head. Also, use the double nut method for removing and re-installing the studs. Or you can also loosen the engine mount and carefullyraise the engine enough to install the header.
12. The passenger side header will install from the top (on 4Runners) or from the bottom (on trucks). Be careful not to damage any wiring or lines/hoses during the installation.
13. Once set in place with the new gasket, tighten all of the nuts to OEM specs.
14. Use the EGR block plate on the intake manifold to block off where the EGR tube came out. Use the original gasket or O2 safe high temp RTV . (Because we are removing the EGR assembly). (Picture 4)
15. On the left front of the engine install 1/8vacuum cap on stock steel line that the EGR valve connected to. (see figure 1)
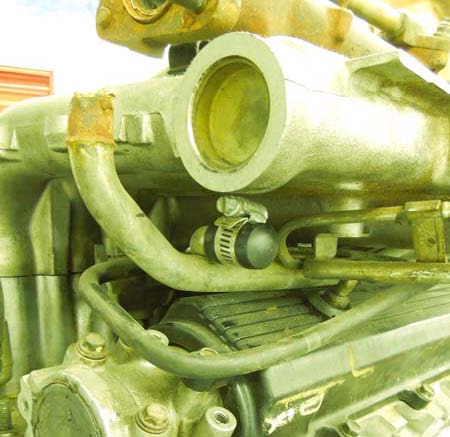
16. We also are removing the air injection pair valve. Follow the large hose off the pair valve and remove the hose under intake manifold . Install the 5/8 vacuum cap use the stock clamp. (Picture 1 & 2).
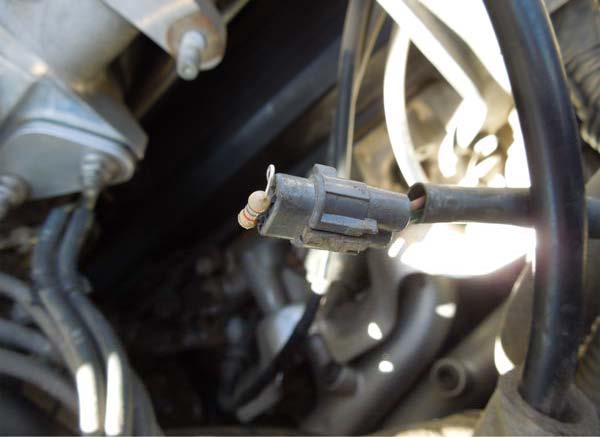
17. The EGR heat sensor plug in the harness is where we will install a resistor. We supply two, a 10k ohm and a 5.7k Ohm. Start with the 10k resistor if the check engine light comes on switch resistor to the 5.7k Ohm. Use electrical tape to cover the plug and resistor. (Picture 3)
18. Check clearance between the headers and any brake lines, fuel lines or any other parts. You may need to adjust the lines or brackets to gain extra clearance on some applications.
Picture #1
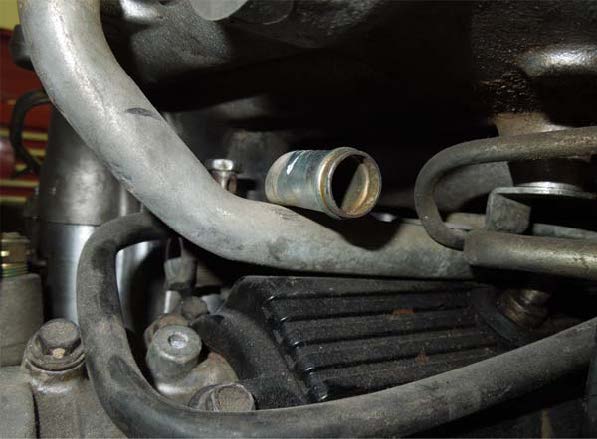
Picture #2
Picture #3
Picture #4

3 Reviews Hide Reviews Show Reviews
-
Excellent quality
These are well worth it for the 3.0 VZE. The install was very straightforward and all parts were a perfect fit. These shipped to a remote town in Canada within a couple of weeks with no damage (lots of protection in the package).
-
Header
Headers look great.
-
Amazing
They look really well made. They even ground down the edges of everything to make them smooth and not sharp. I thought the stud kit was included but I misread it
