


CT20 To Garrett GT25R Turbo Kit
(For Stock Manifold)
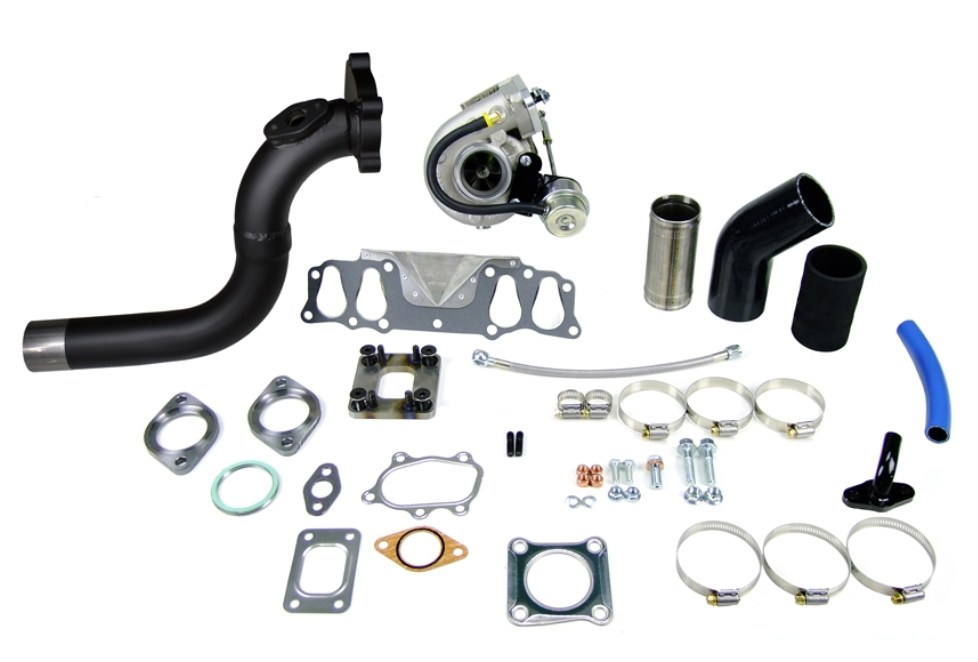
Is your CT20 Turbo going out? Not enough boost? Don't want to spend money on an inefficient turbo? LC Engineering has developed a perfect kit for you! We start by replacing the CT20 with a Garrett GT25R unit. This new Garret is a ball bearing, water cooled turbo that is internally gated and preset to 7psi. The kit includes adapter plates to bolt the Garret to your stock turbo manifold and hot pipe, stainless steel oil feed line, high temp return line with custom adapter to bolt to stock return location, inlet tubing to go to the stock air box, exhaust down pipe to bolt to your factory exhaust, and all the gaskets and hardware needed to perform the installation. You will need to cut your factory hot pipe and installing the supplied hose to lengthen it so it fits between the new turbo and your throttle body. Also, we send 2 1/4" flanges to make the connection to your factory exhaust, so a small amount of welding is also needed. You will not find a more complete kit on the market for your Toyota truck. All parts in this kit are also available separately.
Kit Includes:
- Garrett Turbo GT25R Ball Bearing
- Turbine Inlet Adapter
- New Downpipe
- Oil Drain Assembly
- Oil Supply Line
- 2 Hose Clamps
- 4" Silicone Coupler Hoses
- Turbo Flange Gasket
- Oil Feed And Drain Fitting Gaskets
NOTE: Not California Smog Legal. Toyota has (2) configurations on their turbo oil drain plate. The first routes the lower radiator hard line behind the stock drain. It sits a little taller and doesn't have as much angle as seen here:


The second routes the lower radiator hard line in front of the stock drain. It sits a little shorter and displays more angle than the first example as seen here:


| Note: Images are for illustration purposes only. Images may not represent the product listed. Please contact customer service with any questions or concerns: 1-928-505-2501. |
- 1985-1987 22RET 2.4L Engines
To open a printable PDF version of this instruction
CLICK HERE
Installation Instructions:
-
1. Read all instructions through completely before starting this installation.
2. Disconnect negative battery terminal.
3. Drain coolant and oil (LC Engineering recommends changing the oil and flushing the cooling system when swapping this turbo kit).
4. Remove hot-pipe from throttle body to compressor housing.
5. Remove inlet plumbing from airflow meter to turbo inlet.
6. Remove exhaust from the back of the turbo to the catalytic converter.
7. Remove heat shield on exhaust manifold. Lower portion of the heat shield will not be re-used.
8. Remove coolant lines from turbo.
9. Disconnect oil drain/feed line assembly from turbo.
10. Remove the lower coolant hose hard line.
11. Remove exhaust manifold and turbo charger from engine as an assembly.
12. Remove oil drain/feed line assembly from block.
13. Clean all gasket surfaces (cylinder head, oil drain on block etc"¦).
14. Remove turbo from exhaust manifold.
15. This will be a good time to flush the cooling system before the new turbo is installed.
16. Remove studs from exhaust manifold. Chase threads on manifold to clean up threads (M10 x 1.25).
17. Mount adapter plate to manifold with new gasket and bolts (supplied). Locktite bolts and torque to approx. 30 Ft-lbs.
18. Mount new turbo to adapter plate using the supplied gasket. Turbo will go over pre-installed studs and use the supplied copper cleve nuts.
19. Install new oil drain plate with tube on block using supplied bolts, washers and o-ring.
20. Mock-up complete turbo and manifold assembly on engine (use 3 to 4 bolts on head just to hold it in place). Determine new coolant hose and oil drain hose length. The turbo will have 3/8" fitting attached for the coolant lines.
21. Remove turbo and manifold assembly.
22. Cut coolant hoses to predetermined length and install on turbo (tighten clamps now for easier access).
23. Trim oil drain hose if needed and install on turbo (tighten clamps now for easier access).
24. Remove previously installed oil drain plate w/tube from block and pre-assemble on the end of the oil drain hose. This will make it easier to install instead of trying to bend and twist the oil drain hose onto the tube with the turbo mounted in the truck.
25. Install banjo fitting and banjo bolt to stock oil feed line location on the block. Be sure to use crush washers on both sides of the banjo fitting.
26. Re-install the complete turbo and manifold assembly using the new supplied gasket. Torque manifold bolts to approx. 33 ft-lbs.
27. Connect the coolant lines with supplied clamps.
28. Re-install the oil drain flange to the block with supplied hardware (previously used in step #19).
29. Connect oil feed line from turbo (pre-installed from LC Engineering) to the banjo bolt on block (from step #25).
30. Install intake piping between turbo and air-flow sensor (use supplied hose clamps size #40). This may be a good time to replace the air filter if necessary. (The intake tube on the turbo may need to be rotated for proper fitment).
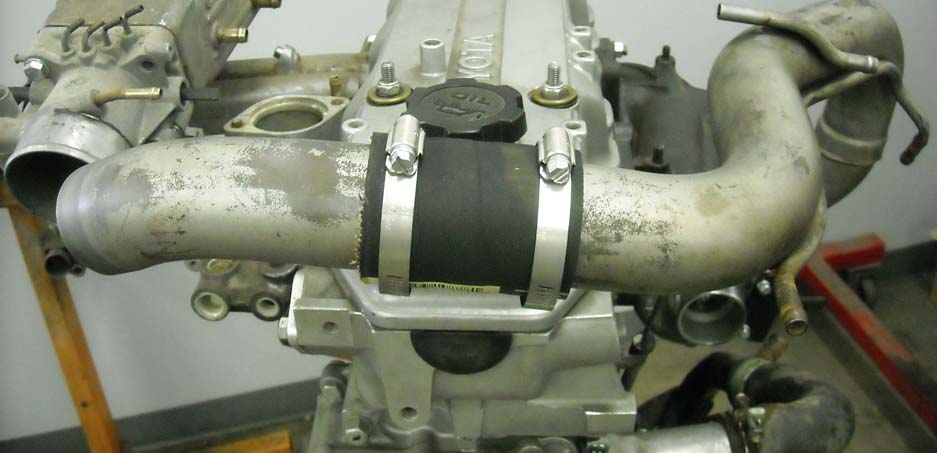
31. Your stock "hot pipe" (goes from turbo outlet to throttle body) will need to be modified. Cut your original hot pipe in the straight area directly in front of the valve cover. Debur and clean pipe to remove any metal shavings and dirt.
32. Use the supplied hose (2 1/8" I.D. x 4" long) and hose clamps (size #36) to connect the newly cut hot pipe together. Install hot pipe and tighten clamps. See pic below.
-
33. Install new downpipe using the copper cleve nuts. Using the gasket and two supplied flanges fabricate a connection between the new downpipe and your existing exhaust system.
34. Reinstall factory oxygen sensor into downtube location.
35. Fill engine with oil and install new oil filter.
36. Fill the radiator and reservoir with coolant. Do not fill the radiator to the top, keep coolant level approx. 1 ½" to 2" below full. Leave the radiator cap off until finished with step #39.
37. Reconnect negative battery cable.
38. Remove ignition coil wire from distributor and ground it out.
39. Crank engine until you get oil pressure.
40. Start the engine and let it idle. Inspect for any leaks at this time. Turn the heater on in the truck to allow the cooling system to cycle completely through. Continue to let the engine idle until the thermostat opens and the coolant level drops. Top off cooling system and install radiator cap at this time.
41. After approx. 100 miles re-torque exhaust bolts.
6 Reviews Hide Reviews Show Reviews
-
Better than OEM.
The only complete kit you should buy to replace the stock CT20 configuration and remain as close to stock as possible. The quality is unmatched and the price is unbeatable for the quality of the craftsmanship and engineering that went into this kit. I would recommend this conversion kit to everyone!
-
Turbo!!!
I recently received the package containing the goodies so I can't really provide a full assessment of the kit. But from a visual standpoint, the components look to be of great quality. Everything in the photo on this website was in the package. Thankfully, nothing was missing. I'll update this review once I get her installed and going. Cheers!
-
Great product ,Great price ,Great Customer Service
I have a CT20 Turbo that cracked and was not able to be repaired. I contacted your Company and Tony emailed me same day. He worked with me and ensured I was comfortable with my purchase, offered to assist any way he could. OUTSTANDING! Since my original turbo is no longer manufactured, I found the cost of this all inclusive kit a great bang for the buck!! I received this just today and am very impressed while unboxing everything!! GREAT all around service and quality!!
-
turbo kit
All hooked up and running great so far,definitely an upgrade in performance.
-
Good kit.
The oil drain could be about 1" out to make the the tube they supplied not bend as hard but I haven't noticed anything that would hint its a problem for the engine. Other than that it went together pretty easy and all the supplied equipment bolted up nicely.
-
1986 Toyota Truck 22R engine turbo replacement kit
Thank you to the whole LCE team for your extensive knowledge and the professional manner in which you all operate. I have not yet started the engine this turbo kit is installed on but will soon. I hope the parts perform as well as you guys do professionally.