


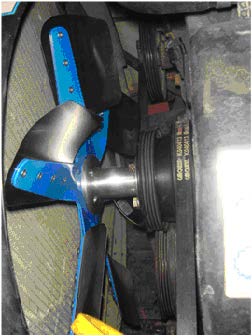
Flex Fan w/ Billet Spacer Kit
Flex-a-lite high performance flex fans are designed to give you maximum airflow at low RPM, and the least amount of engine loading at high RPM. Less resistance at highway speeds equals more horsepower and better gas mileage. Flex fans pull additional air through the radiator at low RPM when the speed of the vehicle isn't enough to cool the engine's coolant system. At higher RPM, when the vehicle's speed forces ample air through the radiator, the fan blades flatten out, resulting in less power being used to spin the fan. Includes additional spacer kit for complete installation.

NOTE: By design, Flex Fans are noisier compared to a stock fan. Noise will not be a valid reason for the return of this item.
| Note: Images are for illustration purposes only. Images may not represent the product listed. Please contact customer service with any questions or concerns: 1-928-505-2501. |
- 1995-2004 5VZ 3.4L Engines
To open a printable PDF version of this instruction CLICK HERE
Kit Includes:
- (1) Billet Aluminum Spacer
- (4) M8-1.25 x 25mm Stud
- (4) M8-1.25 x 16mm Hex Bolt
- (4) M8 Wave Washer
Installation:
-
1. Drain enough coolant from the radiator to remove the upper hose.
2. Remove upper radiator hose.
3. Loosen bolts that hold the fan to the water pump. Do not remove them just loosen them while the belt is still on to make removal easier.
4. Remove drive belts.
5. Remove fan assembly and shroud. Due to minimal clearance you may need to remove the fan assembly and shroud all at once.
6. Remove fan pulley to access the studs that hold fan assembly.
7. Remove studs from pulley hub.
8. Install new supplied studs into pulley hub. Use a mild thread locking compound on the studs.
9. Re-install pulley over new studs.
10. Install flex fan onto the spacer on the bench before you install the new fan assembly into the vehicle. Tighten using supplied 8mm bolts and wave washers. Use a mild thread locking compound on bolts.
11. Set the fan shroud in place but do not tighten.
12. Install fan and spacer assembly on to the pulley assembly using factory nuts.
13. Tighten shroud to the radiator.
14. Install drive belts.
15. Tighten fan spacer to pulley nuts.
16. Re-install upper radiator hose.
17. Turn fan by hand to verify clearance all the way around.
18. Top off coolant level, and check for leaks.
6 Reviews Hide Reviews Show Reviews
-
flex fan for 97 V6 Tacoma
was exactly what it said it was and does exactly what it should, directions were easy to understand, from order to install everything went smoothly
-
nice
looks good fits perfect.
-
Cooling fan
Excellent customer service
-
Stainless flex fan kit
Fit perfect, looks and works great. And I always appreciate your bulletproof packaging.
-
Keeps it cool!
I ordered this fan kit because I have been encountering slight overheating issues during low speed trail riding. The South Carolina summer heat does not help either. Install was straight forward and the instructions were clear. The fan is noisy as stated but keeps the engine cool. Went out on some trails and after a few hours the temp never even though about moving. It even helps keep the auto trans fluid temp down since i also have the B&M trans cooler mounted center. Great product! Would buy again in a heartbeat. The cost of the fan has already paid itself off. Replacing headgaskets on a overheated engine is much more expensive. Great product!
-
Fan
Fan didn't come in yet. LC Crank pulley very happy with the quality . Will soon purchase 22r rods for my 5vz