


Differential Stud Eliminator Kit
When you come home after a trail ride, do you see oil leaking from the center of your axle housings? The stock axle housing studs may be pulling loose. No longer do you have to tap and drill the studs out and replace the studs. Our new stud eliminator kit replaces the studs with Allen head bolts that won't pull through like the stock studs.
Kit Includes:
- (10 Each) High Strength Studs, Nuts, and Washers
- (1) Ultra Gray Silicone Gasket Material
This product should not be used in a manner that violates Federal EPA Laws.
Check out LCEngineering.com for New Products, Tech Articles, Specials & Monthly Newsletters!
| Note: Images are for illustration purposes only. Images may not represent the product listed. Please contact customer service with any questions or concerns: 1-928-505-2501. |
by Trail-Gear
- 1979-1995 Pickup (4x4)
- 1981-1995 4Runner (4x4)
To open a printable PDF version of this instruction
CLICK HERE
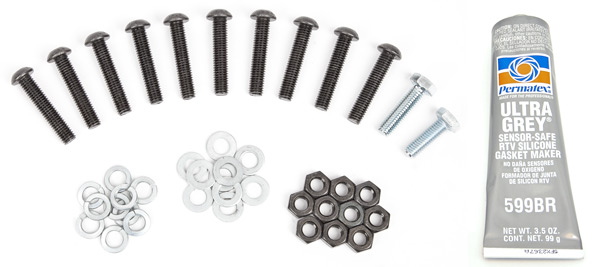
Kit Includes:
- (10) Allen Head Bolts, M8-1.25x40
- (10) Washer, Flat M8
- (10) Washers, Lock M8
- (10) Nut, Hex, M8-1.25 CL10
- (1) Bolt, 25mm, M8
- (1) Bolt, 30mm, M8
- (1) Ultra Grey® Silicon
- (1) Instructions
Tools Needed:
- Blue LocTite® (optional)
- 5mm Allen Wrench
Preparing the Axle:
Start by removing the axles from the housing. Remove the 10 nuts holding the differential in place. Slide the differential out of the housing. Remove all 10 studs from the housing. Clean off all remains of the previous differential gasket. For ease of installation, we recommend chasing all threads before continuing.
Installation Instructions:
-
1. Place one flat washer onto each new bolt.
Thread each bolt in from the inside of the housing.
Blue LocTite® can be used if desired. Tighten
studs with a 5mm allen wrench.
NOTE: If you are
using a Rock Assaultâ„¢ Housing, see Step 2.

2. If you are using a Trail-Gear housing, you will need to use the included 25mm and 30mm bolts in the bottom two holes of the housing. These bolts should be inserted from the outside, into the housing. The 30mm bolt goes into the hole located within the raised surface (green) while the 25mm bolt is inserted into the remaining hole (red).

3. Once all 10 Studs have been installed, spread a thin layer of Ultra Grey® silicone over the face of the 3rd member. Slide the 3rd member back into position on the housing. Place a lock washer and nut on each stud. Tighten nuts in a star pattern.
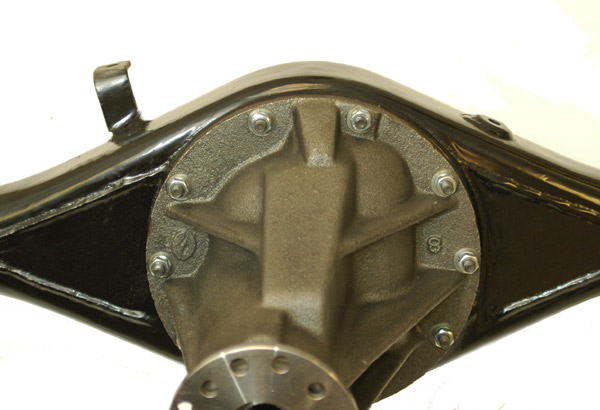
4. Reinstall axles into the housing and fill the differential with gear lube. Recheck nuts after the first trail run.
These instructions are designed as a general installation guide. Installation of many Trail-Gear Products require specialized skills such as metal fabrication, welding and mechanical trouble shooting. If you have any questions or are unsure about how to proceed, please contact our shop at (559) 252-4950 or seek help from a competent fabricator. Using fabrication tools such as welders, torches and grinders can cause serious bodily harm and death. Please operate equipment carefully and observe proper safety procedures.
Rock crawling and off-road driving are inherently dangerous activities. Some modifications will adversely affect the on-road handling characteristics of your vehicle. All products sold by Trail-Gear Inc are sold for off road use only. Any other use or application is the responsibility of the purchaser and/or user. Some modifications and installation of certain aftermarket parts may under certain circumstances void your original dealer warranty. Modification of your vehicle may create dangerous conditions, which could cause roll-overs resulting in serious bodily injury or death. Buyers and users of these products hereby expressly assume all risks associated with any such modifications and use.
1 Review Hide Reviews Show Reviews
-
Great product
Parts are solid but a pain to install other than that no more leaky diff due to loose studs