
 1989-95 Forward Shift")
 1989-95 Forward Shift")

 1989-95 Forward Shift")
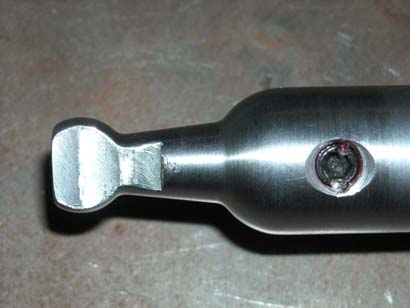
LC Short Shifter Kit (Forward Shift)
You MUST measure your transmission for fitment.
NO RETURNS ACCEPTED ON ANY SHORT SHIFTER KIT
Fitments listed are suggestive. We cannot quote direct fitment to any vehicle, as Toyota changed too much, too often. We have seen factory trucks have a completely different transmission than what the door sticker called out. We have also seen these kits fit other than what is listed, if the measurements line up, there should be no issue. Does your shifter handle feel loose? Does it have a lot of play? Are you tired of reaching into the glove box to find 5th gear? LC Engineering's short shifter reduces the throw by over 40%, a span of 5" of movement! This short shifter kit allows you to keep the stock two piece style shifter handle which will reduce noise and vibration when compared to a one piece. These kits come with new heavy duty shifter end bushings as well as heavy duty shifter seats to replace the old worn out stock rubber seats. Toyota made a few different variations between 85-95 so make sure you get the correct short shifter for your application. If you have any questions, be sure to call into our sales line or email your application questions to us so we can verify that you get the right parts for your application. Below is a quick breakdown of the different options and availability:
Features:
- Shift throw reduced for quicker shifts.
- CNC machined billet aluminum spacer.
- Direct bolt on installation.
- No modifications to factory trim needed.
- Easy installation
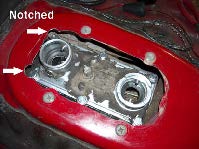
These kits fit the 1989-1995 22R/RE Trucks and 4Runners. These years came stock with two different styles of transmissions; the G58 and the W56-C, D & E. This kit fits the W56-C, D & E applications. It is easy to determine which transmission you have by simply looking at the top of your transmission to determine what type of top plate design you have. The G58 has a 4 bolt plate that houses only the transmission shifter. The W56-C, D & E transmissions have a 6 bolt plate that houses the transmission shifter and the transfer case shifter. That is why these are commonly referred to as "Forward Shift" since the transfer case shifter is located in the transmission; forward of the transfer case itself. Below you will see the transmission version it would cover:

| Note: Images are for illustration purposes only. Images may not represent the product listed. Please contact customer service with any questions or concerns: 1-928-505-2501. |
-
MUST MEASURE!
To open a printable PDF version of this instruction CLICK HERE
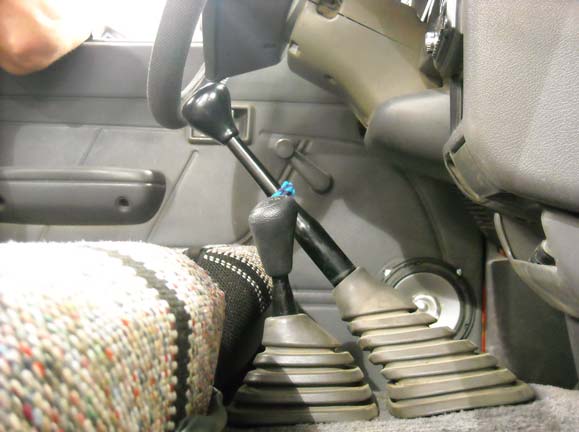
LC Engineering's short shifter kits for the 22R/RE 4wd trucks. This design uses a shifter extension instead of a completely new shifter handle. This allows you to keep the stock 2-piece style shifter handle to reduce noise and vibration through the handle. It also allows LCE to keep the cost more economical for those of you on a tight budget. These kits also come with new heavy duty shifter end bushings and Heavy Duty Shifter Seats to replace the old worn out stock rubber seats.
NOTE: If your motor mounts and/or transmission mount is worn too badly the added height of the short shifter kit can cause interference between the shift tower and the body of your truck.
Installation:
-
1. Set parking brake and chock wheels to prevent accidental movement.
2. Put transmission in neutral position.
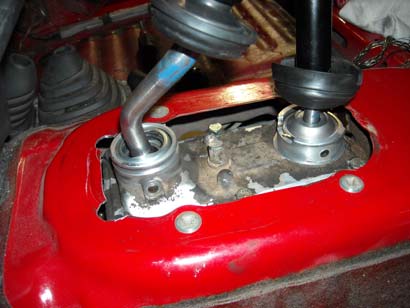
3. Remove center console (if equipped), shift knobs and shifter boots to access the inspection plate (top of transmission).
4. Remove the inspection plate and shifter boots to access the top of the transmission from inside the cab of the truck.
5. Clean the top of the transmission tower and transmission area to make sure no debris fall into the transmission when removing the shift tower.
6. Depending on your application you may also have to remove the transfer case shifter assembly from the transfer case. The transmission shifter has a small plate that is bolted down and holds it in the shifter tower.
7. Remove the shifter tower. There are several bolts that hold the tower to the transmission. NOTE: Be careful when removing the tower from the transmission. Some applications have a rubber gasket that has metal washers inserted through all the bolt holes of the rubber gasket. These metal washers will fall out and drop into the transmission. They are very difficult to find and fish out of the transmission once they fall in.
8. Clean the tower completely and remove the stock shifter seat from the shifter tower and shifter bushing from the bottom of the transmission shifter. NOTE: Remove any debris from inside the transmission while the shifter tower is off.
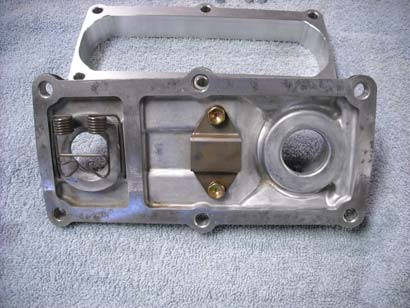
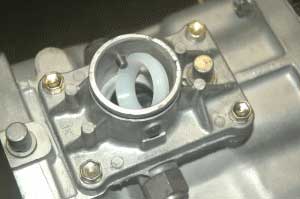
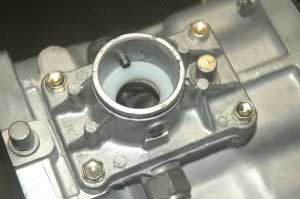
10. Install the new gasket provided and then the shift tower spacer plate.
11. Using the new bolts install your shift tower onto the new spacer plate. You can re-use the stock rubber gasket between the shift tower and the new spacer. If you do re-use it make sure the metal inserts are installed into the bolt holes in the gasket. If your stock rubber gasket is damaged then you can use Ultra Grey silicone to seal this surface as well.
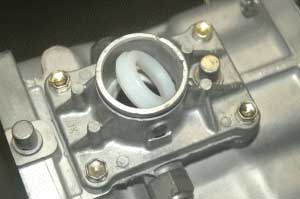
12. Install the new shifter seats into the shift tower. The blue seat goes into the transfer case shifter side and the white one goes into the transmission shifter side. The stock shifter seat is a soft rubber design that can be smashed or squeezed into position. The new heavy duty shifter seats will not install the same way. You will need to put the seat into the tower with the grooves facing down and resting on the two sets of pins in the shifter tower. Then rotate the seat around the set pins until it is sitting in the bottom of the shifter tower. The grooves in the seat should now be facing up towards the shifter handle. The shifter seat may be a little tight to pivot around the set pins. We recommend freezing the shifter seats ahead of time to shrink them up a little and make them easier to install.
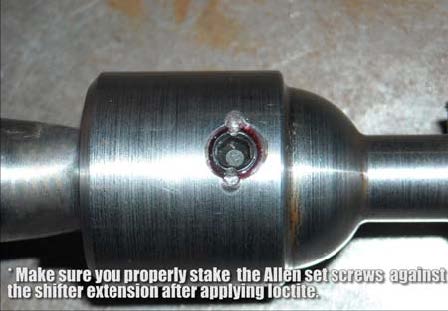
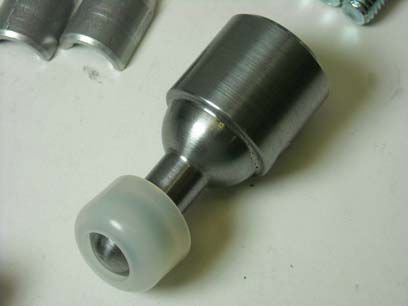
13. Install the shifter extension onto the transmission shifter. The transmission shifter will use the extension with the ball end. It will also use the two keepers to position and retain the extension onto the shifter. The keepers go onto the bottom of the shifter directly above the bottom ball. The keepers are tapered to match the shape of the shifter handle. Make sure to put the keepers on in the correct direction otherwise the extension will not fit properly. Slide the shifter extension over the keepers until it is fully seated. Use the supplied Loctite thread locker on the set screws and install the set screws into the shifter extension and tighten. Be sure to run the set screws in evenly so that they center the shifter into the extension. Stake (peen) the edge of the set screw against the shifter extension as shown in the picture to the right. Install the new shifter bushing onto the end of the shifter extension for the transmission shifter as shown in the picture to the right. NOTE: If you fail to install the set screws correctly they can fall into the transmission and cause major damage. LC Engineering will not be responsible for damage due to incorrect installation!!! As the installer you take responsibility for the proper installation of this product.
14. Install the shifter extension onto the transfer case shifter. Transfer case will use the extension with the flat sided end. Slide the extension over the end of the transfer case shifter so the flat sides of the shifter are in line with the flat sides of the extension. Use the supplied Loctite thread locker on the set screws and install the set screws into the shifter extension and tighten. Be sure to run the set screws in evenly so that they center the shifter into the extension. Stake (peen) the edge of the set screw against the shifter extension as shown in the picture to the right. NOTE: If you fail to install the set screws correctly they can fall into the transmission and cause major damage. LC Engineering will not be responsible for damage due to incorrect installation!!! As the installer you take responsibility for the proper installation of this product.
15. Install the transmission shifter into the shifter tower making sure to line up the shifter extension into the shift mechanism in the transmission. Once the shifter is seated correctly into the transmission push the collar down and rotate clockwise to seat the shifter into the tower.
16. Install the transfer case shifter into the shift tower making sure to line up the shifter extension into the shift mechanism in the transmission. Once the transfer case shifter is seated into the transmission correctly, install the retaining snap ring into the shift tower to seat the shifter into the tower.
17. Start the vehicle up and verify that the transmission on the transfer case both shift properly into all gears.
18. Install your shift boot and console (if equipped).
NOTE: After installing the short shifter there should be no excessive play or travel in the shifters. If, after
time, you notice more play in the shifter, remove the shift tower and inspect the shift extensions to verify that the set
screws have not come loose. If the set screws come loose they can fall into the transmission and cause transmission
failure.
20 Reviews Hide Reviews Show Reviews
-
Shifter
Thanks for the good service. Put it on this weekend.
-
Short shift kit
Changed my shift throw incredibley. Cut the throw in half. Feels amazing and way better than it used to. Works great with my twin sticks. Can now use 2nd and 4th without hitting my hi/low stick. Great quality and fast shipping.
-
Clean and simple install
The kit is complete with everything needed. Just enough to thread lock every Allen and all mounting bolts if you don't over do it. Recommendation, after you put the three Allen screws into the main shifter adaptor and tighten them, you need to stake them well. I recommend stake the first then retighten the other two, stake the second and retighten the last. Then stake the last. I tightened all mine and staked all. The shock of staking made mine loosen up a tiny bit. It was a bit of work to tighten up a staked Allen bolt. Lastly the Allen bolts are a tiny bit long and had a little trouble getting through the main shifter ball socket. You could lock them them down, make a small grind and then stake them. Don't take my recommendations as criticism. The kit is great and took about two inches out of the length on the throw. This kit is well worth the investment!! Good job guys.
-
Amazing!
I had bad nylon grommets anyways after 350,000 miles so I decided to just go with this since my radio mounted below the ash tray often came in contact with my shift boot. This fixed both problems and the 40% reduction in throw is pretty amazing. Couldn't have asked for a better kit!
-
Short shifter kit
Never thought the shifter on my 92 pickup with 200+k miles would fell this solid! Very pleased!
-
91 4wd forward shift
I should have done this years ago. I've had my truck 14 years and it's always had some slop in the shifter. I guess it has progressively gotten worse but I didn't notice. My shifter bushings were almost completely gone. The LCE kit comes with quality replacements along with the beautifully machined spacer. Zero tool marks in the billet spacer. It was almost a shame to hide it under the shift boot. It made a huge difference in the performance of the shifter. It went from old farm truck to sports car in a few hours. I found it easier to tighten the bolts from the bottom of the truck with a bent cheapo wrench. Before I installed the shifter kit, it was sometimes difficult to get the Trans into reverse and 1st after stopping. Making me think the trans was worn out. Now I realize it was a shifter problem. The stick was also hitting my son's car seat making it difficult to drive with him along. Now I can keep my son and my truck! Thanks LCE for another outstanding product!
-
89-95 forward shift
Unreal, the difference, this kit makes!! 1'st to 2'nd, about 2 inches travel!! Same, 2'nd to 3'rd, etc. YOU WILL LOVE IT!! I changed tranny fluid, at the same time, so I could pour new fluid in from top, while shift tower was off! Worst part, was getting that damned clip, on & off of transfer shifter, practice your 4-letter words first! Much easier to assemble new adapter plate, both gaskets, with bolts through entire ass'y, before setting on Tranny! Be very careful, w/orig gasket, as those metal washer's, WILL fall out!! Absolutely LOVE IT!!
-
Short throw shifter
Easy install bushings and shifter took ALL slack out of the shifter now it's short crisp shifts I will have one on every Toyota I have from now on.
-
Great product
Great product! Easy install. I spent more time cleaning than doing the actual install. Received in two days. Xmsn shift quick and clean now. Will buy for all future pickups I buy.