
")
")
Throttle Body Spacer Kit
Our throttle body spacers feature a unique spiral bore that agitates the incoming air to promote better atomization of the fuel molecules, resulting in a more complete burn in the combustion chamber. These kits include a billet aluminum spiral bore spacer, throttle cable bracket relocation plate, and all the hardware needed to install the kit. These kits also include one of LC Engineering's exclusive Teflon throttle body gaskets to reduce the heat transfer from the intake manifold. These kits work great when used in conjunction with our high-flow intake tube and filter kit. Spacers and adapters are hard anodized black for long lasting good looks and durability.
Specifications:
- Spacer Thickness: 1"
- Gain: 5 HP
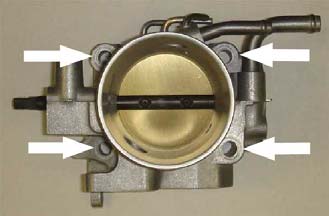
- Opening Size: 59.3mm (2.335")
NOTE: Not for street use in California.
| Note: Images are for illustration purposes only. Images may not represent the product listed. Please contact customer service with any questions or concerns: 1-928-505-2501. |
- 1983-1988 22RE 2.4L Engines
To open a printable PDF version of this instruction CLICK HERE
Kit Includes:
- (4) M8-1.25 X 20 MM Flat Socket Cap Screw
- (4) M8 Flat Washer
- (4) M8-1.25 X 70 MM Socket Head Cap Screw
- (1) 22RE Throttle Body Gasket (Paper)
- (1) 22RE Teflon Heat Isolation Gasket
- (1) Throttle Body Spacer
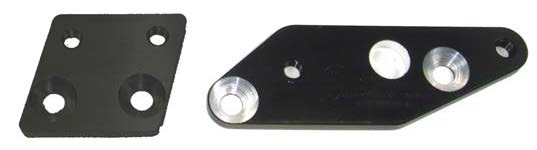
- (1) Throttle Body Spacer Relocation Plate (Front)
- (1) Throttle Body Spacer Relocation Plate (Rear)
- (1) LCE Instructions
Installation:
-
1. Remove air tube from throttle body and from air box.
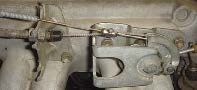
2. Remove throttle cables from bell crank on throttle body. You should be able to remove these without loosening the adjustment nuts.
3. Remove bolts holding the stock throttle cable bracket to the upper intake plenum.
4. Install new throttle bracket relocation plate where the original bracket was using supplied hardware. Some early models will require the square bracket on the rear of the intake.

5. Remove throttle body from intake plenum (Most models use three bolts and one nut). The throttle body does not need to come completely off the vehicle so you can keep most of the lines connected to the throttle body. If you do remove lines be sure that they go back in the same place they started (a camera can be a useful tool to see where everything came from).
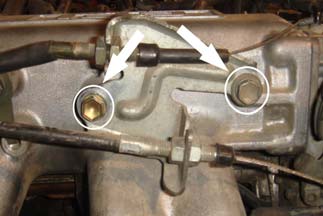
6. Remove the one stud from manifold (Should be the lower left hand mount point).
7. Clean all gasket surfaces.
8. Install throttle body spacer using new gaskets and hardware supplied in kit. Use white thermal gasket on the intake side of the spacer.
9. Install original throttle cable bracket onto the new relocation plate using original hardware.

10. Install throttle cable back onto bell crank. Cables may need to be adjusted. Verify cable actuation from closed to full throttle.
11. Install air tube back into airbox and throttle body. Air tube will push into the upper radiator hose slightly. This will cause no concerns but the upper hose may be modified (Trim end slightly) or loosen the clamps and twist the upper hose slightly to create extra clearance.
16 Reviews Hide Reviews Show Reviews
-
.
.
-
.
It looks way to good to put on my engine
-
Nice Kit
Comes complete with all gaskets, brackets and hardware. Perfect bolt on upgrade.
-
Spacer kit
Great instructions,brackets are perfect, 20 minutes to install. Had to reset computer and adjust idle screw. Only have about ten miles so far.
-
Throttle body spacer
Awsome fitment and looks super clean !
-
Great
It was great service and very fast to get the parts that were ordered. The customer service was awesome, looking forward to doing more Business.
-
Happy customer
Thanks for my throttle body spacer for my 1986 toyota pick 4x4 I noticed way better throttle response as soon as I put it on I noticed my truck has some more power also thanks guys