LC Engineering Front U-Bolt Flip Kit
Maximize your front axle ground clearance and protect your suspension hardware from harsh trail terrain with the LC Engineering Front U-Bolt Flip Kit. Field-tested and proven in our own Project '85 build, this heavy-duty kit completely re-engineers your front leaf spring mounting configuration. On standard factory setups, the U-bolt threads face downward, acting as literal anchors that snag on rocks, stumps, and trail debris. Our innovative flip kit redirects the high-strength U-bolts upward, moving the vulnerable threaded sections out of harm's way and eliminating potential trail hang-ups.
Unlike inferior aftermarket kits that utilize generic square U-bolts, our premium system features heavy-duty, round 9/16" U-bolts that are perfectly contoured to mirror your front axle tube for a superior, non-slip clamping force.
Premium Off-Road Construction
- Rock Clearance Maximization: Flips your leaf spring hardware upside down, completely removing downward-facing snag points and keeping your threads safe from rock rash.
- Axle-Contoured 9/16" U-Bolts: Upgraded round-bend 9/16" hardware provides an exact, high-tensile wrap around the factory axle tube, delivering unmatched structural stability over square-profile alternatives.
- Chamfered Bottom Plates: Precision-machined, heavy-gauge bottom plates feature smooth, chamfered edges to prevent the plate from biting into or binding against your leaf spring pack during extreme articulation.
- Energy Suspension Bumpstops: Includes a pair of premium polyurethane bumpstops to cushion heavy suspension impacts, protecting your leaf springs and chassis from bottoming out.
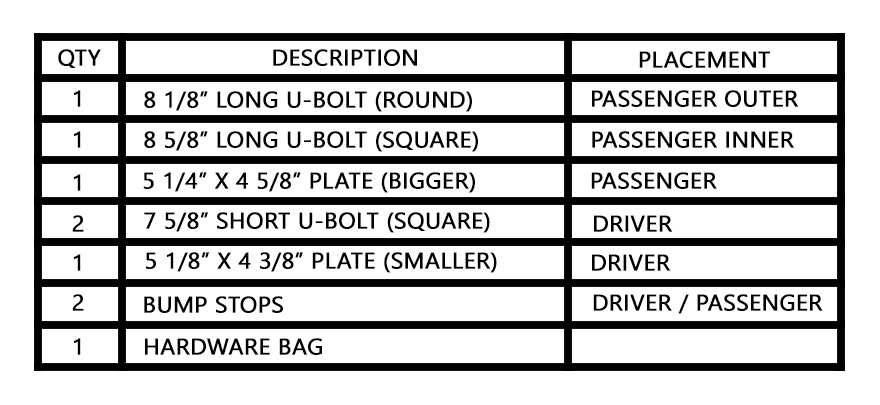
Kit Contains
- (2) Heavy-Duty Chamfered Flip Plates
- (4) Premium 9/16": Round Axle U-Bolts (with high-tensile nuts and washers)
- (2) Energy Suspension Polyurethane Bumpstops
Technical Specifications
- Placement on Vehicle: Front Axle Layout
- Hardware Specification: 9/16" High-Tensile Steel Round-Bend Bolts
- Bumpstop Material: High-Density Energy Suspension Polyurethane
- Mounting Style: Direct Bolt-On Integration
Important Installation Note:
This front U-bolt flip kit requires the use of an aftermarket crossover high-steer conversion kit (such as Trail-Gear or similar) to clear your steering linkages. It will not clear the factory push-pull steering layout.
| Note: Images are for illustration purposes only. Images may not represent the product listed. Please contact customer service with any questions or concerns: 1-928-505-2501. |
- 1979-1985 Pickup (8" Axle Housings Front)
- 1984-1985 4Runner (8" Axle Housings Front)
CLICK HERE to open a printable PDF version of these instructions.
LCE U-Bolt Flip Kit | Front
Safety Guidelines & Procedure
Before beginning installation, ensure your workspace is secure by following these critical safety precautions.
- Park on Solid Ground: Always position the vehicle on a flat, level, and solid surface (such as a concrete garage floor) before lifting.
- Secure the Vehicle: Set the parking brake firmly and place wheel chocks behind the tires remaining on the ground to prevent any accidental rolling or movement.
- Use Proper Support: Never work under a vehicle supported only by a hydraulic jack. Always lower the vehicle securely onto high-quality, properly rated jack stands before placing your hands or body underneath.
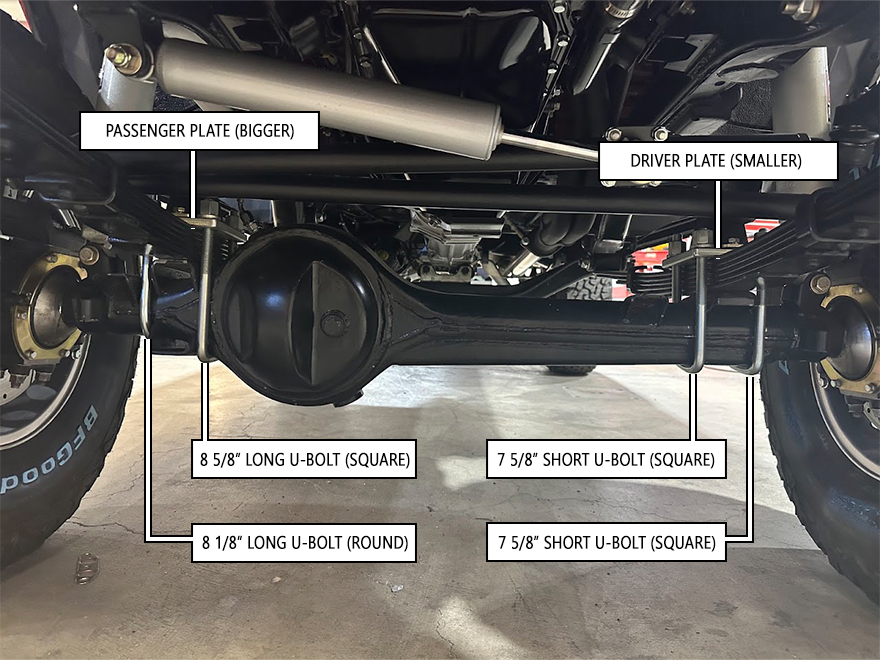
Front Axle Configuration Guide
The front axle utilizes two different U-bolt flip plates. Please identify and orient them carefully before tightening:
- Passenger Side (Right): Uses the plate with the wider bolt spacing. Install this plate with the wider spacing facing forward toward the differential. The passenger side hardware consists of one large round U-bolt and one square U-bolt. The square U-bolt must be positioned on the inner side of the leaf pack, aligning with the wider bolt hole spacing on the plate.
- Driver Side (Left): Uses the matching plate with narrower, uniform bolt spacing. Both driver-side U-bolts are identical in size and are smaller than the passenger-side hardware.
Installation Instructions
- Lift and Support: Raise the front of the vehicle using a high-quality floor jack. Securely support the frame rails using properly rated jack stands, ensuring the front suspension is fully unloaded.
- Remove Wheels: Remove the front wheels and tires to gain clear access to the axle hardware.
- Unbolt Factory Hardware: Place a floor jack securely under the front axle housing to support its weight. Remove the factory U-bolts and spring plates. (Pro-Tip: We highly recommend replacing hardware on one side of the vehicle at a time to keep the axle aligned).
- Position New Hardware: Slide the correct LC Engineering flip plates and U-bolts into position according to the configuration guide above.
- Torque Specification: Tighten the U-bolt high-tensile nuts in an alternating cross pattern until they reach a final specification of 90 ft-lbs.
- Mount Bumpstops: Install the included polyurethane bumpstops onto the top of the flip plates using the provided 3/8" bolts and washers.
- Reinstall Wheels: Mount the wheels and tires, then carefully lower the vehicle back down to the ground.
- Brake Line Inspection: Cycle the steering lock-to-lock and inspect the front flexible brake lines. Ensure they have adequate clearance, are not stretching at full droop, and do not rub against any new hardware. Adjust brackets or lines as necessary.
Important Maintenance Requirement
It is absolutely critical to use a high-quality, calibrated torque wrench to torque all U-bolts exactly to 90ft-lbs. Leaf springs will naturally compress and settle after installation; therefore you must re-torque all U-bolts to 90 ft-lbs after the first 500 miles of driving to prevent hardware loosening or axle shifting.