


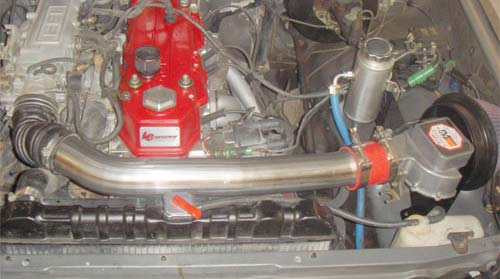
LC Pro Air Intake Kit
Now 50 state smog legal!! You asked, we delivered! For years we've been offering our stainless steel crossover intake tube, as well as the K&N FIPK kit for the same trucks. Well now we've combined the best of both worlds! We have developed an intake tube and filter kit designed to eliminate the restrictive filter box as well as get rid of the plastic intake tube and rubber elbows. The best part is that we're making it more affordable! By using an open element filter and fabricating our own air meter bracket, we were able to reduce the material cost significantly. This all means you get a great product at a lower price than if you were to buy the parts separately! These kits include the powder coated intake tube, silicone hose connections, open element K&N filter, custom air meter bracket, all clamps and bolts needed, and for 89-95 applications, we've included a K&N breather to eliminate the bypass tube for applications outside of California. To stay C.A.R.B. approved you must run a by pass tube in California. C.A.R.B EO #: D-462-2.
Replacement Filter, see Part #: 3035092.
NOTE: If you have a China replacement radiator that mounts 1" to 3" away from the radiator support this kit will not work.
| Note: Images are for illustration purposes only. Images may not represent the product listed. Please contact customer service with any questions or concerns: 1-928-505-2501. |
- 1985-1987 22RE 2.4L Pickup
- 1985-1987 22RE 2.4L 4Runner
To open a printable PDF version of this instruction CLICK HERE
NOTE: Prior to installing this air intake kit, it is imperative to perform a thorough cleaning of the air tube using a mild detergent and water to eliminate any accumulated debris or contaminants. Failure to do so could result in potential engine damage.
Installation:
-
1. Disconnect negative battery cable.
2. Remove cable clip that holds the air meter cable to air box lid.
3. Unplug air meter harness and set aside. Take caution not to break the spring clip that holds the plug to the meter.
4. Remove three bolts that hold the air box to inner fender
5. Loosen hose clamps where air tube meets air meter, as well as throttle body side. On 83-88 models, the elbow is retained on the throttle body side.
6. For 88-95 vehicles, remove vent hose from air box.
7. Remove intake tube, air box and air meter as an assembly. Remove snorkel from grille.
8. Unbolt air meter from air box.
9. Remove studs from air meter. We recommend the double-nut method for removing the studs.
10. Install the new bracket on to air meter using the stock gasket and four included allen bolts. Apply a small amount of thread locker to the threads to keep them from backing off. Be careful not to over-tighten the bolts.
11. Install bracket to inner fenderwell. The front bolt hole from the stock air box will be re-used to locate the plate. Install one included 8mm bolt and tighten just enough so that the bracket can still be moved slightly.
12. On 89-95 vehicles, the harness must be relocated around the new bracket. See photo for routing recommendation.
13. Install new intake tube with supplied clamps and silicone hose coupler on air meter side. On 83-88 models, the factory tube is re-used on the throttle body side. The tube is a tight fit to the factory elbow; silicone lubricant will make installation easier. On 89-95 models, the kit includes a new silicone 45º coupler for this connection. The "˜fat' end of the tube goes on the air meter side. Leave the clamps loose for now. The tube will locate the bracket and filter where it needs to be for drilling.
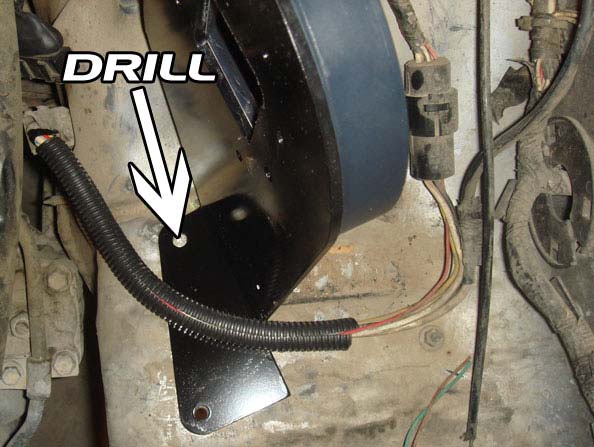
14. Using the bracket as a template, make a mark on the fenderwell through the unused hole. This will be where you will drill through the fender to insert the second bolt.
15. Remove intake tube, then remove the bracket, filter and air meter as a complete assembly and set aside.
16. Center punch where you marked for the bolt hole in the fenderwell. Using a 21/64" drill bit (3/8" will also work), drill the hole in the fenderwell, taking caution as to only drill through the fenderwell. Make sure there is nothing below the drill point that may get damaged from the drill bit.
17. Install the bracket/air meter/air filter adapter assembly back into the vehicle using the two 8mm bolts, washers and lock nut provided (They bolt the bracket to the inner fenderwell)(Use wave washers on bolt side and use the flat washer on the nut side). Tighten securely.
18. Re-install intake tube, position in such a way as to give maximum clearance to radiator and hood, then tighten hose clamps. You can loosen the upper radiator hose and twist it around slightly to gain more clearance.
19. To retain the vent tube on 88-95 models you must install the included ¾" x ¼" NPT nylon fitting into the back side of the air filter bracket (you must do this on 88-95 models to keep smog exemption). Early vehicles (83-87) need to install the included ¼" NPT pipe plug into this hole, using thread sealer. There are two options for the auxiliary ¾" tube on 88-95 models: To retain the air tube from the air filter to the air valve resonator, install 3â„4" hose between the resonator and the bracket. Clamp both ends snugly. This way will keep the kit smog legal in all 50 states. To remove this air tube, simply install the supplied ¼ NPT pipe plug into the filter bracket then install the supplied breather to the top of the resonator and tighten clamp snugly. Do not over-torque or you cam damage the resonator. Removing the bypass tube and installing the resonator breather will void the smog exemption (no longer smog legal).
20. Re-check all clamps and hardware and tighten as needed.
21. Connect air meter plug and harness.
22. Install air filter on to bracket and tighten hose clamp. Do not over-tighten
23. Reconnect battery cable
24. Perform final fit check by verifying that the new tube kit clears all moving engine parts such as the fan, pulleys, belts etc.
25. Start vehicle and check for any leaks.
17 Reviews Hide Reviews Show Reviews
-
Awesome product.
Top quality product and very friendly service . Item arrived ahead of schedule. Thanks!
-
Easy to install
Very easy to install but fit is extremely tight.
-
Feel the power
Ordered this and was fast shipping and everything was in great condition and well made.Easy to install and you can feel the throttle response is a lot better and it sounds amazing,thanks again
-
Good value and Fit
I imagine the mod business is making good mods. This Pro Air kit is a wonder of American ingenuity. One change I would make is to abandon using the existing forward mounting hole. I have in mind to allow easier removal of the filter element the two holes should be drilled about an inch over from the existing hole closer to the engine. I may do this eventually or when I have to clean the filter. This should be done keeping the SS tube and the AFM opening at least 1/4 inch apart within the silicone sleeve. I notice now my motorhome accelerates going uphill where before I could floor it and it would just sit at the same speed. Great job guys!
-
Quality
Perfect fit works and looks fantastic
-
cold air induction
This product installed very easily and made my truck performance much better.
-
quality
fit nice, installed easy, looks good although i was a bit disappointed with the marks on the crossover tube from the bending process even though its a minor detail
-
Looks good
should help once installed. workmanship looks great.