LCE Heavy-Duty Rear U-Bolt Flip Kit
First seen and torture-tested on our iconic Project '85 rock crawler build, the LC Engineering Rear U-Bolt Flip Kit is now available for your own rig! Engineered specifically for classic Toyota trucks and SUVs, this kit is an essential upgrade for off-road enthusiasts looking to maximize axle clearance and protect critical suspension hardware from harsh trail abuse.
Why Flip Your U-Bolts?
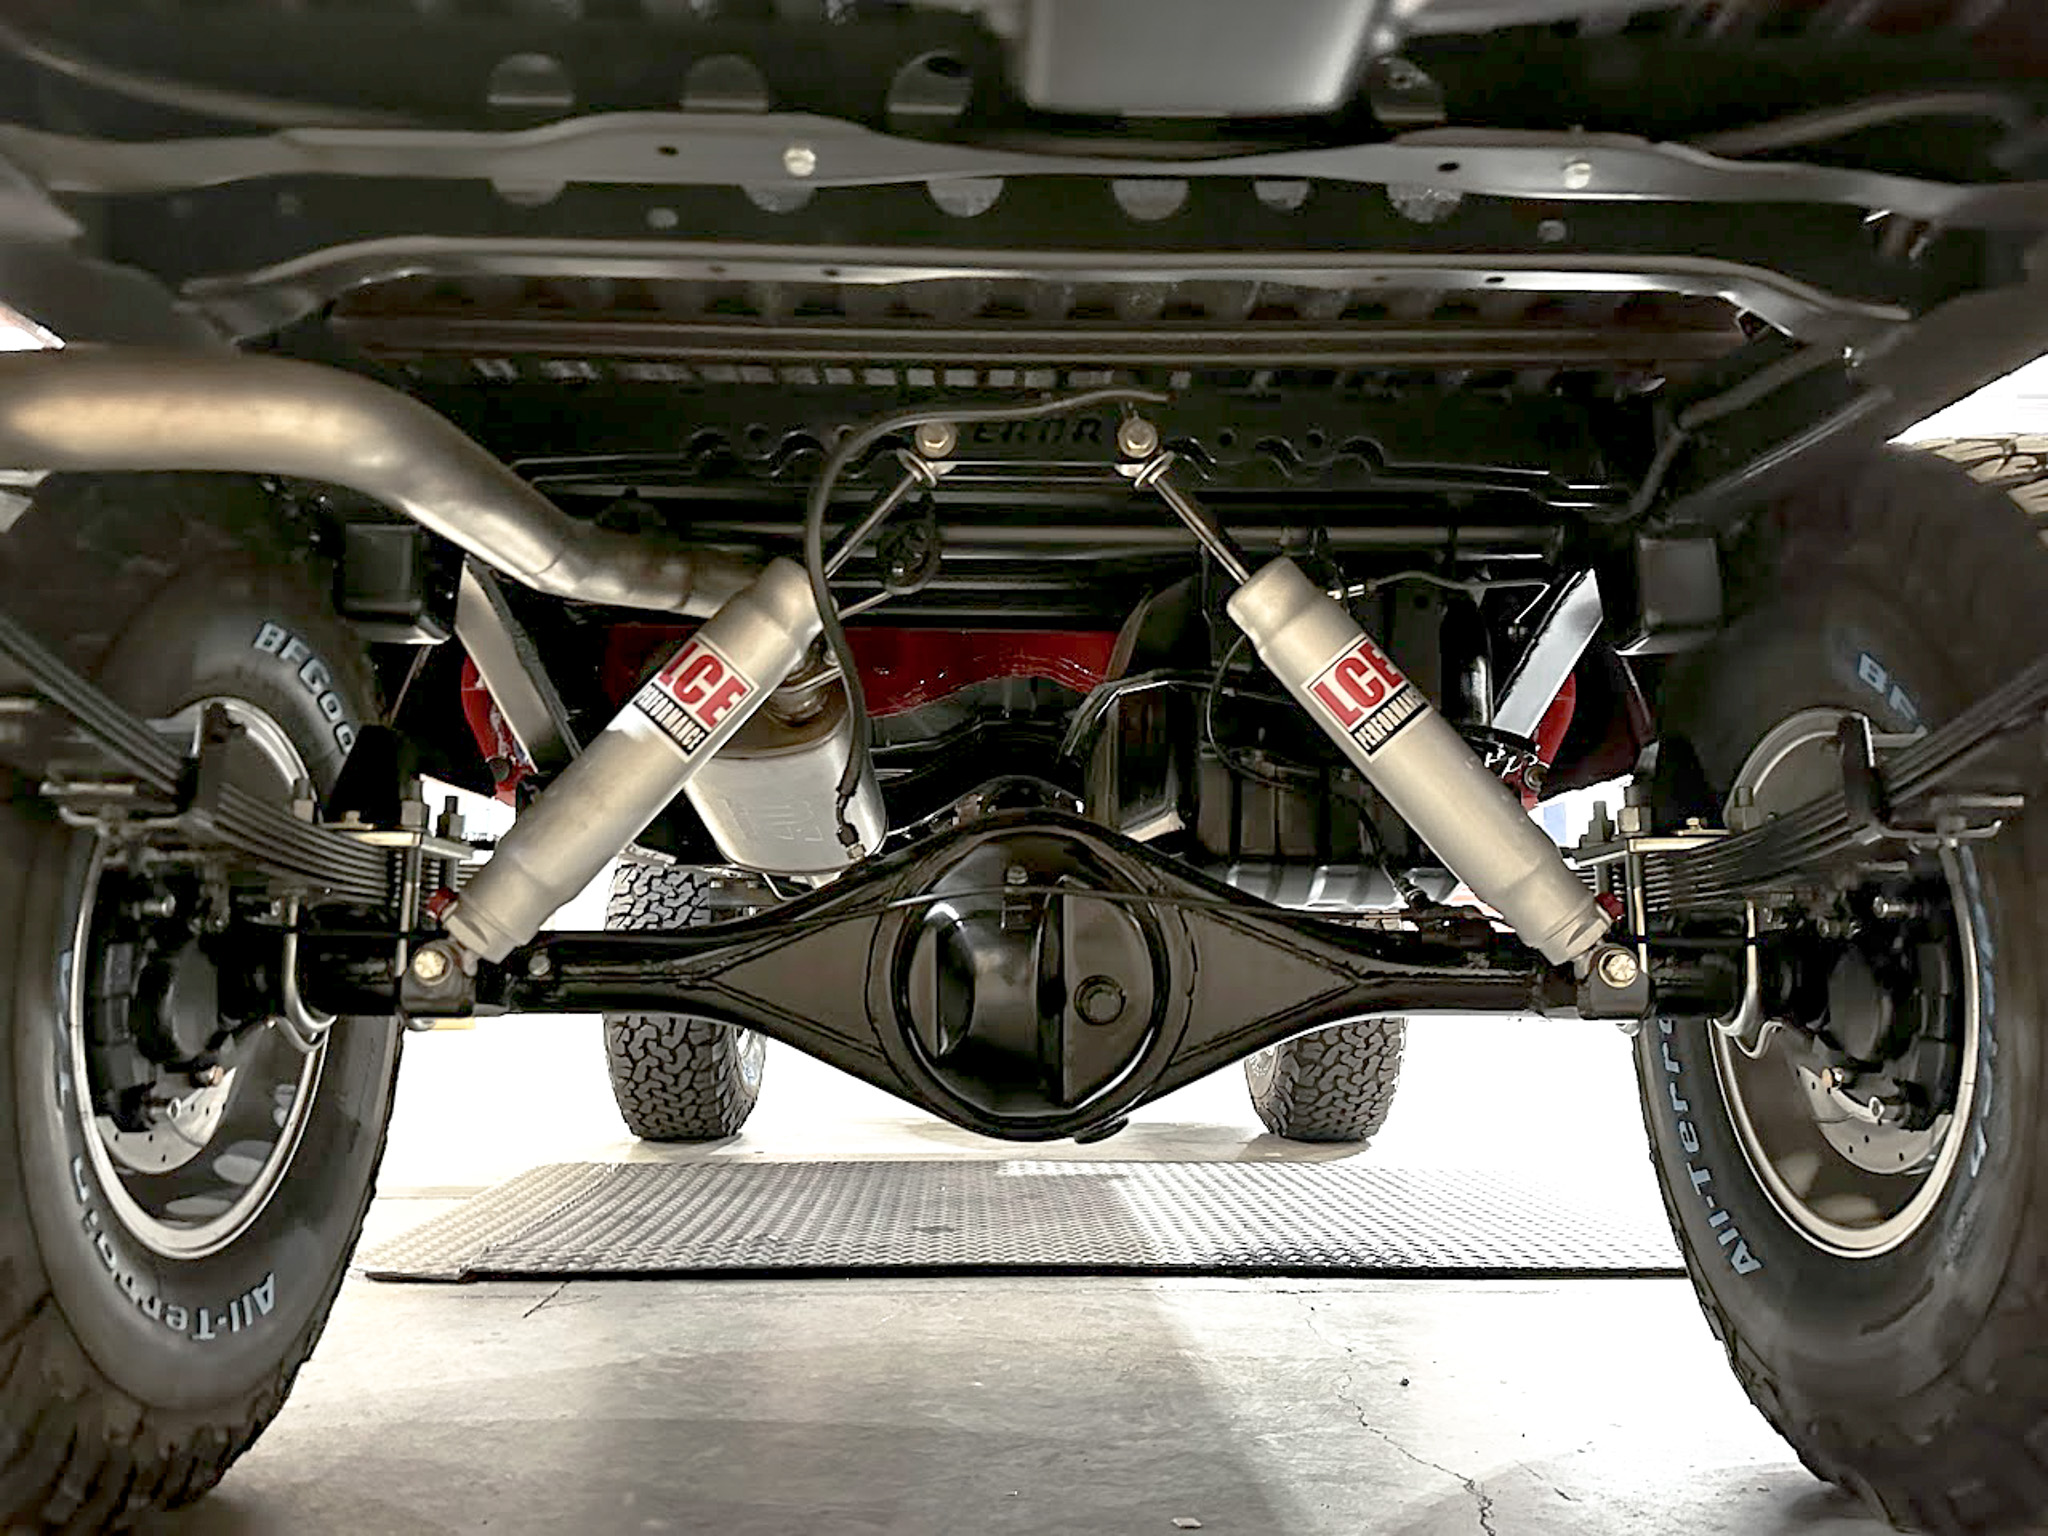
Factory Toyota U-bolts face downward, leaving the vulnerable threaded ends exposed at the lowest point of your rear axle. This design creates notorious "anchor points" that catch on rocks, stumps, and trail debris, often bending the hardware and ruining the threads.
The LCE U-Bolt Flip Kit completely rotates the assembly, redirecting the threads upward and out of harm's way. This flat-bottom configuration significantly improves ground clearance under the leaf springs and prevents costly trail damage.
Premium, Leaf-Friendly Engineering
Unlike generic aftermarket kits that utilize crude square-bend bolts or harsh, sharp-edged steel plates, LCE brings precision engineering to your suspension:
- True Round-Bend 9/16" U-Bolts: Custom-contoured to match your factory Toyota axle tube perfectly, distributing clamping force evenly and preventing axle tube deformation.
- Chamfered Bottom Plates: The heavy-duty lower plates feature precision-chamfered edges. This critical design detail prevents the plate from cutting into or binding your lead spring back during articulation, preserving the life of your springs.
- Integrated Bump Stops: Includes premium Energy Suspension polyurethane bump stops to handle hard compressions smoothly without the harsh metal-on-metal bottoming out of factory stops.
Features & Highlights
- High-Clearance Design: Eliminates downward-facing threads to prevent hanging up on obstacles.
- Rugged Construction: Heavy-gauge steel construction designed to withstand severe rock bashing and off-road loads.
- Complete Bolt-On Kit: Includes everything required to overhaul one complete rear axle.
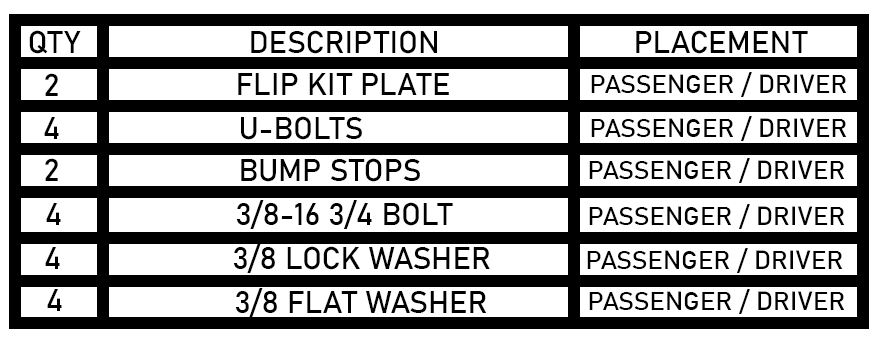
Kit Contains
- (2) Heavy-Duty, Chamfered Flip Plates
- (4) Premium 9/16" Round-Bend U-Bolts (with matching nuts and washers)
- (2) Energy Suspension Polyurethane Bump Stops
| Note: Images are for illustration purposes only. Images may not represent the product listed. Please contact customer service with any questions or concerns: 1-928-505-2501. |
- 1979-1995 Pickup (8" Axle Housings Rear)
- 1984-1995 4Runner (8" Axle Housings Rear)
CLICK HERE to download a printable PDF version of these instructions.
LCE Rear U-Bolt Flip Kit
Safety First
Before beginning the installation process, please read and understand all safety protocols. Failure to follow proper shop safety procedures can result in serious injury or vehicle damage.
- Park on Level Ground: Always perform vehicle maintenance on a flat, solid, and stable surface such as a concrete garage floor.
- Secure the Vehicle: Engage the parking brake completely and place wheel chocks firmly behind the tires remaining on the ground to prevent any accidental rolling or shifting.
- Use the Proper Support: Never rely solely on a hydraulic jack to hold the vehicle up. Always support the chassis securely with high-quality, properly rated jack stands before working underneath.
Required Skill Level: Advanced
Fabrication and welding are required for this installation. This kit moves the U-bolt threads to the top of the axle, which eliminates the factory lower shock mounting points. New lower shock mounts must be welded directly to the axle housing. You can retain the factory upper shock mounts and weld on new lowers, or convert the upper mounts to an inboard configuration for maximum suspension articulation.
Pre-Installation Notes & Safety
Read the Safety First section before beginning.
- Brake Line Caution: Take extreme care not to overheat, pinch, or damage any brake lines or emergency brake cables during the removal, mock-up, or welding processes.
- Shock Length Verification: Moving the shock mounts alters your suspension geometry. Always cycle the suspension to confirm proper shock lengths (collapsed and extended) are used to prevent the shocks from bottoming out our over-extending.
Step-by-Step Installation Procedure
- Vehicle Preparation: Park the vehicle on a flat, solid surface. Chock the front tires, jack up the rear of the truck, and support the chassis securely with high-quality jack stands placed under the frame rails. Lower the floor jack slightly so the frame rests completely on the stands.
- Wheel Removal: Remove the rear lug nuts and take off both rear wheels and tires to gain full access to the rear suspension.
- Factory Hardware Removal: Position a hydraulic floor jack under the rear axle housing to support its weight. Working on one side at a time, remove the factory leaf spring U-bolts and the lower factory spring plates.
- U-Bolt Flip Kit Installation: Position the new LCE chamfered flip plate on top of the leak spring pack, ensuring the chamfered edges face downward toward the leaf springs. Guide the new 9/16" U-bolt nuts in an alternating cross pattern (star pattern) until you reach a final specification of 90 ft-lbs (122 N m). Repeat steps 3 through 5 on the opposite side of the vehicle.
- Torquing the U-Bolts: Using a high-quality torque wrench, tighten the 9/16" U-bolt nuts in an alternating cross pattern (star pattern) until you reach a final specification of 90 ft-lbs (122 N m). Repeat steps 3 through 5 on the opposite side of the vehicle.
- Bump Stop Installation: Mount the supplied Energy Suspension polyurethane bump stops to the top of the LCE flip plates using the provided 3/8" bolts and washers. Tighten securely.
- Fabrication & Shock Mount Fabrication: Position your new aftermarket lower shock mounts onto the axle housing. Mock up the shocks to verify correct alignment and clearance through the suspension cycle, then prep the metal and weld the new mounts securely to the axle tube.
- Brake Line Clearance Check: Thoroughly inspect all hard and soft brake lines to ensure they were not damaged during the welding process. Verify that the lines clear all moving suspension components; depending on your shock placement, the brake lines may need to be gently rerouted or relocated for proper clearance.
- Final Assembly: Reinstall the rear wheels and tires, lower the vehicle safely to the ground, and torque the lug nuts to factory specifications.
- Mandatory Re-Torque Check: New suspension hardware naturally seats and settles within the first few hundred miles of use. It is absolutely critical to check and re-torque all U-bolt nuts to 90 ft-lbs after the first 500 miles of driving. Failure to re=torque hardware can lead to loose spring packs, leaf shifting, and catastrophic suspension failure.