

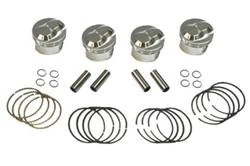
Pro Series Forged High-Compression Piston Set | 12.0:1 Standard Bore
Take your engine's performance to the next level. Backed by more than a decade of rigorous track testing and development, these premium forged aluminum piston kits are proven to deliver substantial horsepower gains and up to 15% more torque over factory piston sets. Engineered to thrive under the brutal torture of high-RPM racing, this kit is the ultimate bottom-end upgrade for competitive builds and high-performance street machines alike.
Every LC Engineering Pro Piston Kit is an all-in-one package utilizing elite, race-ready components designed to minimize rotating mass while maximizing cylinder sealing.
What's Included
- Forged Aluminum Pistons: Engineered for incredible structural integrity and thermal efficiency under high cylinder pressures.
- LC Pro Ring Sets: Advanced Ring Design engineered for maximum compression sealing and reduced friction.
- Lightweight Tool Steel Chrome-Moly Wrist Pins: High-strength pins designed to handle extreme loads without adding unnecessary weight.
- Spiral Locks: Premium-grade locks to ensure wrist pins remain securely in place under high-RPM stress.
Specifications
- Bore Size: Standard (STD) Bore
- Compression Ratio: 12.0:1 (High-Compression)
Technical & Ordering Notes
- Valve Clearance: Custom piston notching is available to provide necessary valve clearance for high-lift, high-duration performance camshafts. Please refer to our Notch Labor service for more details.
- Return Policy: Due to the strict engineering tolerances of standard-size components, no returns are accepted for Standard size piston sets. Please ensure your engine block is fully measured and within factory specifications before placing your order.
| Note: Images are for illustration purposes only. Images may not represent the product listed. Please contact customer service with any questions or concerns: 1-928-505-2501. |
- 1985-1995 22R 2.4L Engines
- 1985-1995 22RE 2.4L Engines
CP Forged 94mm Piston Kit
When installing CPN or CPN2 piston rings, we recommend using a plateau hone with a cylinder bore cross-hatch angle of 35° to 40°.
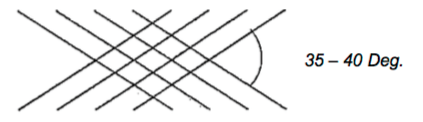
Recommended Honing Process & Materials
To achieve the ideal surface roughness for gray cast iron engine blocks and Nikasil cylinders, manufacturers recommend a two-step honing process:
1. Initial Honing
- Conventional Stones: Use #220 - #280 grit.
- Diamond Stones: Use #325 - #550 grit.
2. Finish & Smoothing
After the initial hone, finish the surface to remove jagged peaks, torn material, or folded medal using one of the following methods:
- A fine-grit conventional abrasive (#400 - #600 grit).
- A flexible brush sweep of the bores.
- A nylon-bristle plateau honing tool.
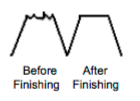
Recommended Surface Roughness Specifications
Before honing, confirm with your equipment manufacturer that your chosen stone grit will achieve the following target roughness specifications.
- Rz (Average Peak-To-Valley Height): 59-138 microinches (1.5 to 3.5 micrometers)
- Ra (Roughness Average): 15 to 35 microinches (0.4 to 0.9 micrometers)
CP Piston Ring End Gap Guidelines
Critical Warning: Failure to properly check and set your piston ring end gap can result in catastrophic engine failure.
The recommendations provided below are general guidelines. The optimal ring gap varies based on your specific engine configuration and application. Increased clearance is typically required for extreme applications, including:
- Forced induction (Turbocharged / Supercharged)
- Nitrous Oxide (NOS) setups
- Filled engine blocks
- Endurance Racing
-Note: The final determination and execution of the proper end gap is the sole responsibility of the engine builder. For additional technical support, please contact CP directly at 949-567-9000.
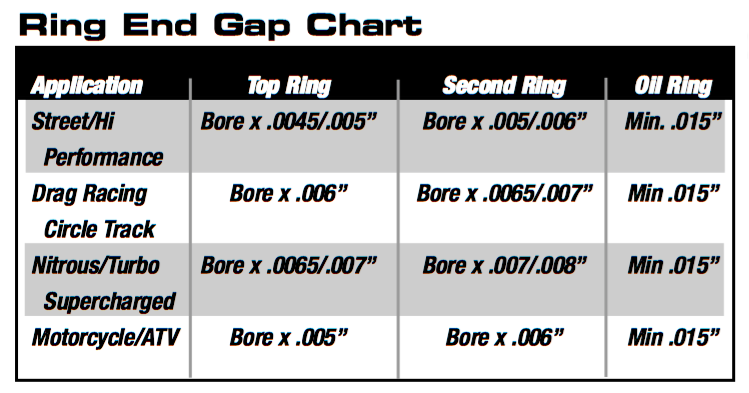
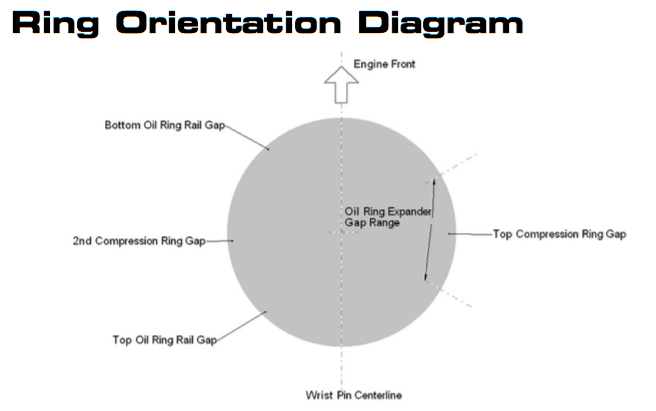
Piston Ring Measurement & Installation Guidelines
The following steps are general guidelines for installing piston rings. Because certain high-performance setups require specific clearances, always consult the included charts and diagrams before final installation.
Step-by-Step Ring Gap Measurement
- Prepare the Block: If applicable to your engine, install a torque plate and torque it to factory specifications.
- Square the Ring: Position the piston ring into the cylinder bore, ensuring it sits flat, square, and completely below the deck of the surface.
- Measure the Clearance: Use a feeler gauge to accurately check the gap between the ring ends.
-Important: If your measured ring gap is tighter than the recommended minimum for your bore size, you must carefully file-fit the rings to achieve the proper clearance. Failure to maintain a safe minimum gap can cause severe engine damage.
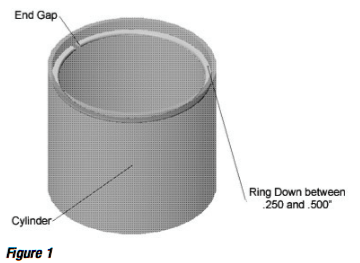
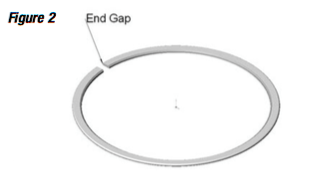
Ring Filing Process
- Use the right tool: Always check and adjust ring end gap using a dedicated ring gap filing tool.
- Filing Direction: File the ring ends in an inward direction (from the outside edge toward the center) to prevent chipping or damaging the outer face coating. Ensure the filed ends remain perfectly square to the sides of the ring.
-Technical Note on Bore Size: Ring sets are manufactured for precise cylinder bore dimensions. For every 0.001" the cylinder bore measures over its intended size, your ring end gap will increase by 0.00314".
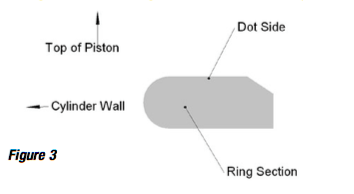
Top Ring Orientation Guide:
Before installing the top piston ring, check its markings and profile to ensure correct orientation.
- Marked Rings: If the ring features a stamped dot or writing, always install it with the marked side facing up.
- Beveled Rings (Unmarked): If the ring is unmarked but features an inner bevel, install it with the bevel side facing up.
- Symmetrical Rings: If the ring has no dots, writing, or inner bevels, it can be installed either side up.
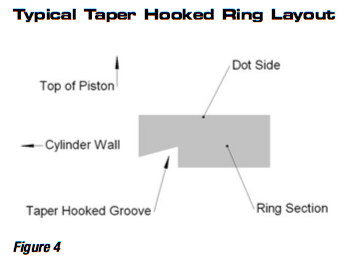
Second Ring Orientation Guide:
Before installing the second piston ring (scraper ring), carefully check its markings and groove profile to ensure proper orientation.
- Marked Rings: If the ring features a stamped dot or writing, always install it with the marked side facing up.
- Taper Hook Groove Style: If the ring features a taper hook groove, the groove must always be face down toward the bottom of the piston.
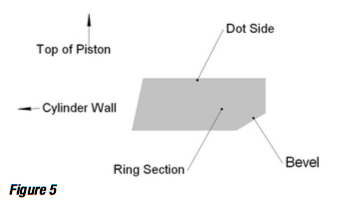
- Beveled Rings (Unmarked): If the ring if unmarked but features an inner bevel, install it with the bevel side facing down.
- Symmetrical Rings: If the ring has no dots, writing, or inner bevels, it can be installed either side up.
Oil Ring Orientation Guide:
- Three-Piece Assembly: Most CP oil rings consist of three separate components: two steel side rails and one center expander ring.
- Rail Clearance: The end gaps on the top and bottom rails must be at least 0.015". Ensure the rail ends do not overlap when installed.
- Do Not Modify: Never modify, file, or cut the center expander ring in any way.
Disclaimer & Warranty Policy
Due to the extreme demands of high-performance applications, all CP Pistons/Pankl products and services are sold strictly "as is" and "with all faults."
- No Warranty: There no warranties, express or implied, including any warranty of merchantability or fitness for a particular purpose. Buyers are given full opportunity to inspect all parts and services prior to purchase.
- Limitation of Liability: CP Pistons/Pankl shall not, under any circumstances, be held liable for any special, incidental, or consequential damages. This includes, but is not limited tom damage to or loss of other property or equipment, loss of profits or revenue, costs of replacement goods, or any third-party claims resulting from the sale, installation, or use of these parts.


